Showing posts with label Tutorial. Show all posts

Sunday, October 7, 2012

Tutorial: Rainbow Glitter Zebra Print iPhone Case

I have had more compliments on my current iPhone case, and people are always asking where I got it, so I figured I'd do a tutorial to show you guys how to make your own!  You can thank me later ;)


The case itself is a clear soft rubber case I got on the cheap from ebay for $.99, shipping included.  The seller is easy to find and fantastic to deal with.  Message me if you are having a hard time finding them.

So your supplies:
1.  Glitter in whatever colors you choose.  I used my Martha Stewart super rainbow glitters lol
2.  Cuttlebug & zebra print folder (comes in a set of 4 different animal prints)
3. Old paintbrush
4.  Pencil
5.  Blade
6.  Mod Podge or equivalent
7. Your iPhone
8.  Clear iPhone case
9. Piece of plain white paper (something lighter than cardstock. text-weight works great!)


So the first thing I did was use the pencil to trace around the outside of my iPhone on the white paper. Cut it out on the line.

Next get out your Cuttlebug, put the paper into the zebra print folder & use your A+B+B plates.  Emboss!


Take your embossed paper and fit it into the case. Trace the camera hole and cut it out.


 Next get out your Mod Podge and your old paintbrush.  Use the paintbrush to apply the MP to the first (and second, if you so desire) indented section of the embossed image.  Make sure you have the correct side of the insert faced up, you don't want to finish glittering and discover your camera hole is on the wrong side ;)


Sprinkle your first color of glitter liberally over the MP'd section and gently press it down with your finger.  Tap off extra and return it to the container. 


 Repeat the above steps until you have all the areas filled in that you want glittered.


After it's dry you may want to go back and repeat the process on any sparse areas.


Once it's completely dry, dust off any extra glitter that might be lingering and fit it into your case and onto your phone!  Enjoy!

I could have used my massive Glitter Ritz collection for this, but let's be serious, GR is expensive, so I save it for cards, and my other high end products ;)  In case you were curious which shades of the Martha Stewart glitter I used:


Tuesday, September 18, 2012

Slacker Update!

Alright, so it's been at least a week, alright, more than that, but I DID actually start getting things accomplished!

Let's take a look at the original list:

1.  Plan out blog posts
2.  Make August ATCs
3.  Make Sept. ATCs
4.  Start planning for upcoming Craft Shows
5.  Sort unfinished scrapbook projects.
 
Okay, so I only did 2 of the 5.  TWO IS BETTER THAN ZERO!  I probably could have crossed off number 1 too, as I did get a couple of good suggestions for blog posts, and they can at least get me through September. 

So what have I been doing?  I'm ashamed to admit it, but since Guild Wars 2 launched at the end of August, I'd kinda gotten myself sucked back into the gamer world.  I was playing a lot, and ignoring my other responsibilities, so obviously I had to put a stop to that.  For the last couple of days I've limited myself to an hour a day.  And surprisingly it's been in the last couple of days that I've started being productive in life again lol  Go figure.


Oscar is growing and becoming more awesome each day.  Puppy Socialization is going MUCH better.  He's actually getting out and sniffing/kinda playing with the other dogs!  And yes, here comes the mini photo spam ;)


He seriously gets cuter every day :)

As far as crafting goes, I'm FINALLY feeling creative again!  I've finished my ATCs for August (lol slacker) and September (EARLY!).  I have a few cards I need to finish up, Christmas Cards to start (for craft shows and for my peeps), and a couple of potential card classes to plan.  I'm not even going to include all the Scrapbooking projects that are staring at me right now... 

Oh, and I made a YouTube Channel!  There's no videos on it yet, but I've been asked to do some video tutorials, so I figure I'd at least get it all set up before I start.  So Subscribe to me!

Well that's about it.  I PROMISE to be better about blogging.  I have my list to work from, so I'll get something up by the end of the week.  As always, feel free to give me topics to write about, ask questions or request tutorials!  AND FOLLOW MY BLOG IF YOU HAVEN'T ALREADY!

;)

Sunday, July 29, 2012

Tutorial - Glitter Ritz & Outline Stickers

So today's post was going to be about the ATC I made for this month (Theme: Birds), but I decided to make it into a tutorial instead, and kill 2 birds with one stone (pun intended? lol)

Tutorial: Glitter Ritz & Outline Stickers


So I used one of my favourite, yet time consuming, techniques on my ATCs this month:  Glitter Ritz with outline stickers.  You will need the following items:


1.  Outline stickers - I usually use 'Peel Offs', but there are other great brands out there too, so make sure you experiment!
2.  Peel Offs Magic Tape (pictured below)
3.  Glitter Ritz 
4.  Double Sided tape- I used Sookwang tape for this
5.  A pin
6.  Tweezers
7. A dry paintbrush or cloth - Used to wipe off excess glitter
8. Xacto Knife

At this point I only took off the background, not the outer border, so ignore the fact that it's still on there lol
So this first thing I did was to take the stickers out of the package, and peel off the background and outside border parts of the sheet.  Like I said, I was doing this to make ATCs so I needed to do 11 of these birds, which would only leave one on the sheet.  If you only need 1 or 2 for your project, just cut them right off the sheet and then peel the background off of your cut outs.


Next, cut a piece off of your Magic Tape (MT) that is slightly larger than your sticker. You don't HAVE to cut it small, but I find it's MUCH easier to work with if I do.  Press it down over the sticker, and rub over it well, making sure the outline sticker adheres to the MT.

Flip everything over and gently start to pull back the with backing of the outline sticker.  Try not to pull the backing 'up', aim to almost fold it in half backwards and pull away so that the sticker releases from the backing and sticks to the MT.  This is where the pin comes in handy.  Use the pin to help release the sticker from the backing, and to get all the little parts that don't come off as easily.

The goal here it to have the entire sticker with all it's inside parts transfer directly to the MT, sticky side UP, as seen above.


Once your sticker is successfully adhered to the MT, flip it over and stick it to your double sided tape.  Rub down on it so that it adheres to the double sided tape.  Your first few transfers with a new piece of Magic Tape will be more difficult as it's still really sticky.  And sticky on sticky is NEVER fun to deal with.  As you will find out a couple of steps from now lol  Pull the MT off in the same way you pull the sticker sheet off in the last step, pull back, not up.  Use your pin again if you need help getting the pieces off.


So your next step is to cut your stickers out.  You could technically skip this step, but it's a HUGE waste of glitter, and you all know how much I love my glitter :)  I painstakingly cut out the first 10 birds with scissors.  It was NOT FUN AT ALL.  Then I had an "I wonder..." moment and tried a blade, and OMG SO MUCH EASIER!  USE THE BLADE FOLKS!


This is when things get a little bit difficult.  As you know you now have a sticker stuck to double sided sticky tape.  And you need to remove some of the sections out of the inside of your outline.  We all know the formula: sticky + sticky = STUCK.  Well here is where your tweezers and LOADS of patience come in handy.  I wanted to accent certain bits with one color and then do the body another color.  You can do it all one color, or you can use more than I did, it's absolutely your call.


I pulled out the pieces for the beak, the accent dots, and the eyes (mind you after I took out all the eye stickers, I realized I pulled the wrong ones out.  Should have been the tiny dots, not outline of the eye.  Sadface.)  Use your tweezers and the pin to help get the pieces out.  But take them out gently.  Remember, the whole thing is only LIGHTLY adhered to the backing on the OTHER side of the double sided tape, the part that is meant to release easily for when you want to adhere your stickers to the final project.

Pour a small amount of GR over the exposed bits, rub it in a circular motion with your fingers, tap off the excess, and use your dry paintbrush (or equivalent) to get all the extra glitter off.


Repeat the above steps with the main sections of the body.  Here is where you have to be REALLY careful about pulling the sections out.  They are much bigger and therefore are much more resistant to your pulling.  Go slow, take deep breaths, and take breaks if you need to.


Use your next color to fill in the bigger sections, rub in with a circular motion and dusting off the excess as you go.  There you go!  Your stickers are done!  I know it is a pain to do them, but the results in person are oh so amazing! 

Here are my finished ATCs:


And here are a couple of cards I made about a year ago with the same technique (and sheet of stickers lol)/  The scroll was cut out with my Cricut and just stuck to the double sided tape.  MUCH easier to do, but only useful if you are planning to use only 1 color of glitter on your image. 

I really do love the finished product when using this technique, but it can be a real pain, so I only do it about once a year lol  I think I'll sit down one weekend and just make a big glittery mess of my craftroom and get a bunch of them done.  I've been collecting outline stickers for years and they (and my Glitter Ritz collection) are DYING to be used!


Friday, June 29, 2012

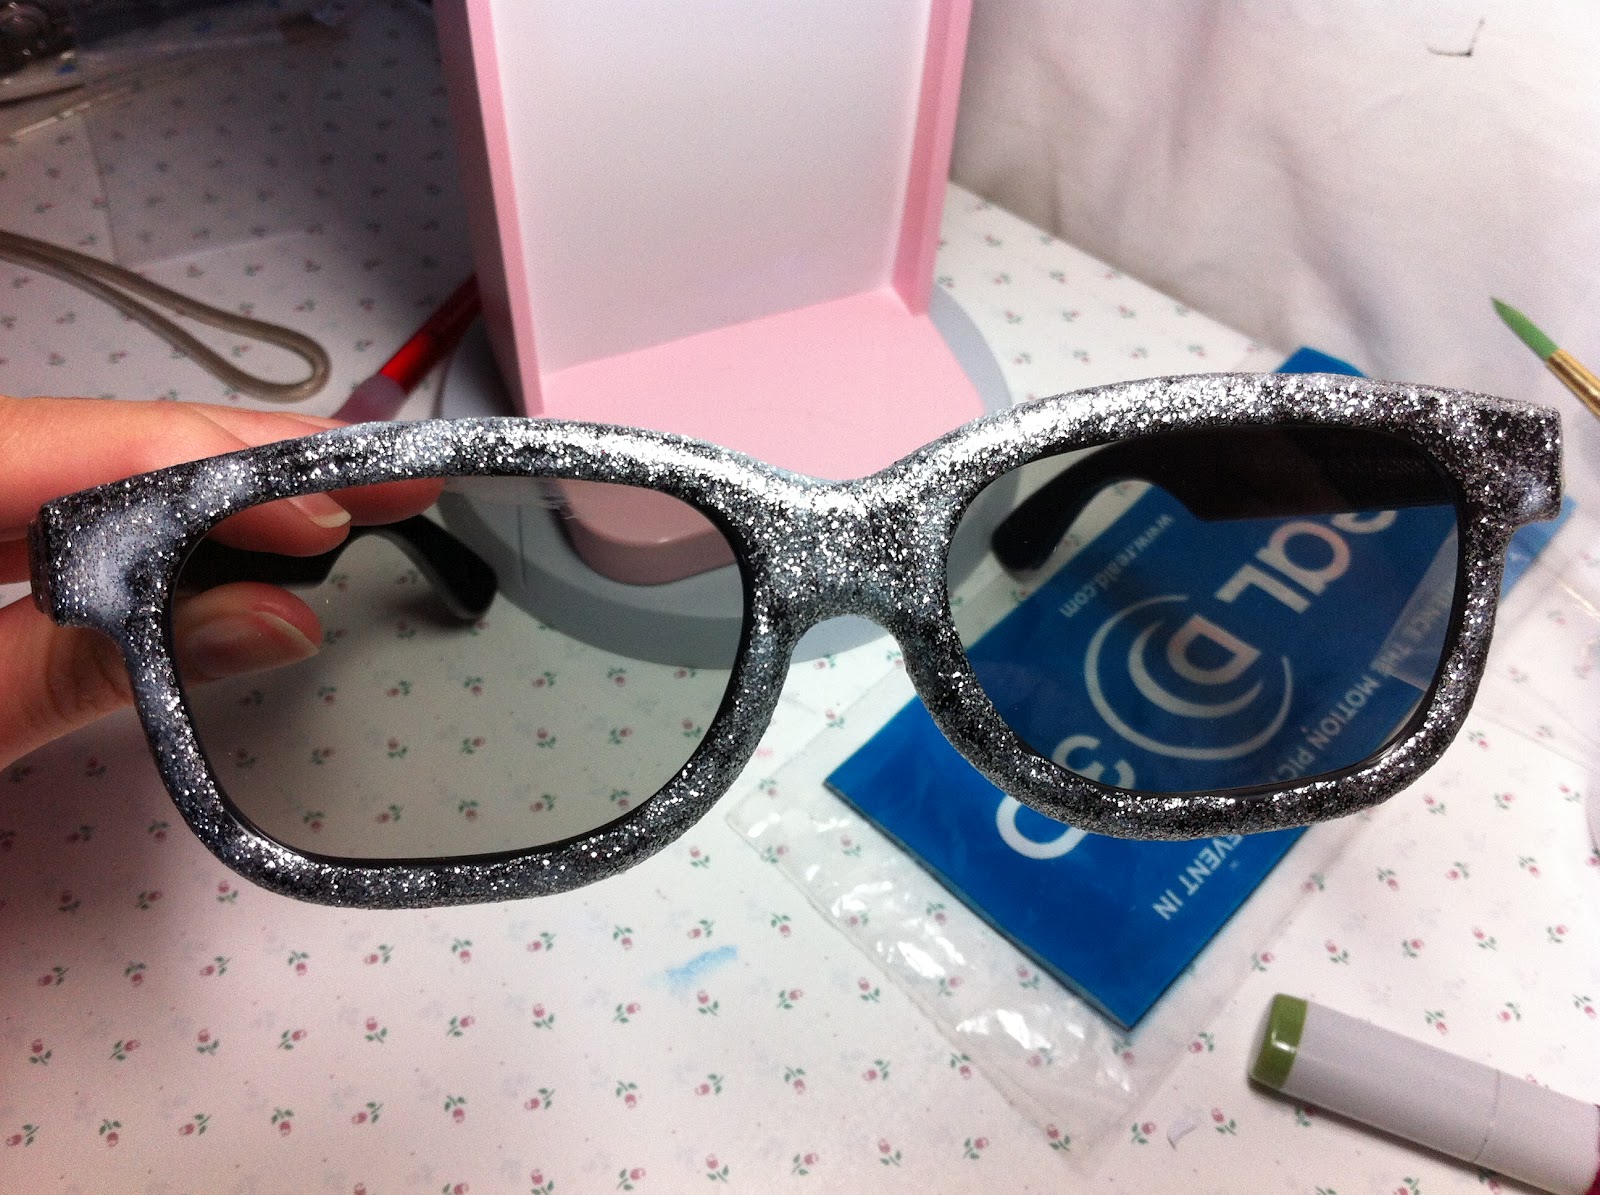
Tutorial: Blinged-out 3D Movie Glasses!


I've noticed lately while cleaning that I have amassed a large-ish collection of those 3D glasses you get when you go to the movies.  I know, I know:  "But you're supposed to RETURN those when the movie's done!!"  Well I don't.  I figure if I have to pay an arm and a leg to see a movie, I'm damn well going home with a parting gift!

Well, the eco-friendly part of me had a FAB idea:  Why don't I take those glasses and bling them out and REUSE them!  That way I don't have to take anymore when I go to the movies, the ones I did take will get used again, AND mine will be the envy of ALL in the theatre!  Win-Win-WIN!

How to Bling-out your 3D Movie Specs!


Supplies:
~ 3D Movie Glasses, mine are 'Real D 3D'
~ Decoupage Finish (Modge Podge, etc), I used Plaid brand
~ Really fine glitter, I used Martha Stewart in Sterling
~ Sponge brush
~ Plastic container


Step 1:


Pour a small amount of decoupage finish in your container.  I didn't measure it out, but I didn't use a lot, probably about 1/4 cup.  Pour in some of your fine glitter.  Again I didn't measure, but always go with less, then stir, & then check to see how 'saturated' it looks.  Add more if needed.


Step 2:


Dip the tip of your sponge brush in the glitter mixture and apply to the glasses.  I started on one arm, then the front, and lastly did the other arm.  I didn't do the backside of the glasses at all, and I didn't do the 'bottoms' of the arms because I wasn't sure how comfortable the glitter would be on my ears after 2+ hours of movie ;)

Be very careful not to get it on the lenses!  If you do happen to get a bit on, use a Q-tip and some warm water to try and get it off.

For the first coat, I started with a brushing motion, but figured out halfway through that I was getting better results by 'tapping' it on. I made sure it was fairly thick, not dripping, but thick enough that it looked more white than black.


 Step 3:


Let it dry between coats, the longer you can leave it the better, though with these ones as soon as it was dry to the touch, I put another coat on.  Try to have a spot to hang them while they dry.  I used my Ottlite lol


Step 3


Add more coats until desired effect is achieved.  I ended up doing 3 coats, I probably would have been fine with 2, but you guys know how much I love glitter lol

After 1 coat:


After 3 coats:


Step 4

Now's the time that, if you so desire, you can continue blinging out your specs!  Add crystals!  Add bows!  The sky's the limit!  I chose to keep these ones fairly tame, but I have every intention of breaking out my super duper Martha Stewart set of rainbow glitters and making a rainbow pair lol 


Now aren't these cuter than boring basic black??


Can't wait to see what you guys come up with.  Tweet me your pics @Mostly_Mandy :)

Side note:  I've had this post done for a while, but I've scheduled it to publish on the day that Magic Mike hits theatres.  And no, it's not being released in 3D.  Unfortunately.

Saturday, June 9, 2012

Tutorial: How to Awesome-ize your iPhone Case

I have a problem, and I'm sure I can't be the only one in the world with this problem, so I'm coming out and screaming it from the hilltops so that others of my kind can join with me in unity:  I AM A SCRAPBOOK PAPER HOARDER!  There I said it.  It's out there now.


I'm the kind of girl that goes into a craft supply shop and sees these amazingly sparkly, cute, or otherwise fantastic pieces of paper and buys them.  Normally that wouldn't be a problem if I actually had a project in mind for them.  BUT I NEVER DO.  I see them and I lose my mind over the *insert attention grabbing detail here* and I grab it before someone else does.  Oh, and never just one sheet, it has to be at least 2 , you know, in case I use one.   Please tell me it's not just me that does this.  Someone?  Anyone?  Bueller?

 If you've been following my blog, you'll know that I was without my glasses for a few days and had to come up with things to keep me busy that didn't require me to see in the distance (read: No TV).  One of the things I decided to do was go through my scrapbook paper collection to see what I actually have in those cases.  I really do have some pretty papers!  I tried to come up with card ideas, but I sell my cards, and I really wanted to keep this paper in my life, so I thought:  "Hey!  Why not cut out a piece of each and use them as inserts for your iPhone case!"  OMG.  Brilliant! I can accessorize and use some of my collection AT THE SAME TIME!  Win- win!  Oh shizz... AND redeem myself with a non-fail tutorial too!  Win-win-win!

How to Awesome-ize Your iPhone Case

Step 1:  Gather your supplies

~ Awesome scrapbook paper (try not to use anything too thick, it makes the case buldgy around your phone)
~ Scissors
~ Utility knife
~ Pencil
~ Clear iPhone case
~ Pretend that ruler is a cutting mat (I have no idea why the ruler is in the pic, and I covered the cutting mat with the paper... don't judge me)

Step 2:  Use your iPhone as a pattern

Place your iPhone on the backside of your selected paper, and trace the outside of it with your pencil.


It should look like this when you are done:


Use your scissors and cut along the pencil line.

Step 3:  Cut out the camera/flash hole

Fit your paper into the clear case, design side out.


Lightly press your finger against the paper under the camera hole so that you can use your pencil to trace the inside of the hole.  Next, take the paper back out of the case and put it on the cutting mat.  Use your utility knife to cut out along the line you just drew.  Try to cut just on the outside of the line so that you don't see any overlap once the case is on.  It should look like this, but neater:


Step 4:  Assemble your snazzy new case!

Clean the inside of your case to get rid of any dust or glitter that might be there.  Pop in your pretty paper, and then your phone.  Voila!  SO USEFUL!


Here's another one I did:


So there you have it!  Now you can accessorize your phone to match your outfit, the season, or just whatever sparks your fancy!   I'd love to see what you guys come up with!  Tweet me your pics @Mostly_Mandy or post links to your creations in the comments section :)

I hope you enjoyed this tutorial!  It went much better than my last one did lol